
Steps to get ReCrystallize Pro up and running fast.
1. Ensure that the IIS web server is installed on your PC. On Windows Server, add the Web Server (IIS) Role in Server Manager. For desktop versions of Windows. find and enable IIS in Windows Features.
2. Run the ReCrystallizeProSetup.exe file to install ReCrystallize Pro.
3. Install any database client software (e.g. Oracle client) and configure any ODBC System DSNs that may be needed by your reports.
- If your reports access your database through ODBC, create a System DSN with the same name and configuration as the one used to design the reports. (User DSNs are not available to the web publishing service.)
- Be sure to configure any ODBC connections using the 32-bit ODBC Data Source Administrator. Reports run in a 32-bit process by default, so they can’t use 64-bit ODBC. If your Windows menu doesn’t include a shortcut to the 32-bit ODBC tool, it is available at C:\Windows\SysWOW64\odbcad32.exe
- If your reports use a SQL Server database, configure the ODBC System DSN to use TCP/IP (not named pipes) and SQL Authentication (not NT Authentication). Your SQL Server must also be configured to allow SQL Authentication.
- If your reports use an Oracle database, install and configure the Oracle client software on the web server.
4. Copy your Crystal Reports .rpt files to the C:\ReCrystallizePro\Reports folder. This folder is mapped to /ReCrystallizePro/ in the IIS Default Web Site. To view reports in this folder, use a web address in the form
http://servername/ReCrystallizePro/webpage.aspx
For example, to view a report on the local server, the web page might be
http://localhost/ReCrystallizePro/myreport-static.aspx
5. Run the ReCrystallize Pro wizard to create web pages to run your reports. A shortcut is available in the Windows Start Menu.
- Select the option to use ASP.NET.
- If you are using a ReCrystallize Pro evaluation license, select the “Static” option to display data that is saved in the .rpt file. To save data in the .rpt file, select the “Save Data with Report” option in the Crystal Reports file menu, refresh the report data, and save the report.
- The ReCrystallize Pro evaluation license will allow you to select the “Dynamic” option to display live data from your database, but will not create Dynamic web pages at the end of the process. Purchase a ReCrystallize Pro license at www.recrystallize.com to activate the trial version in place and unlock the full capability to view reports with live data. Your ReCrystallize Pro purchase is covered by a 30-day money-back guarantee, so you can be sure that live data works as expected in your environment. The purchase also includes any technical support that may be needed.

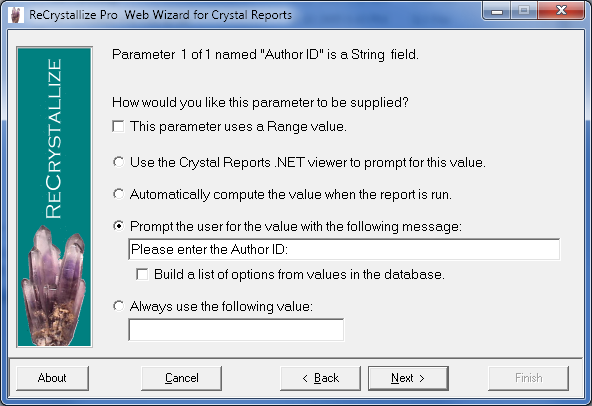
- If using the Dynamic option, continue through the wizard for each parameter value required by the report. (Parameter screens will not be displayed when using the Static option.)
- Select a report viewer option. The Crystal Reports .NET viewer is recommended in most cases. Alternately, you may download the file directly as a PDF document, an Excel spreadsheet, or another type of file.

- Select display and behavior options for the report viewer.

- Click Finish and note the start page indicated on the Finish screen.
- Open your web browser to the start page for your report, for example
http://localhost/ReCrystallizePro/your-report-static.aspx
Post your comment on this topic.